Linux LVM: Getting started (ext4)
In Linux, Logical Volume Manager (LVM) is a device mapper target that provides logical volume management for the Linux kernel. Most modern Linux distributions are LVM-aware to the point of being able to have their root file systems on a logical volume.
— Wikipedia
Create
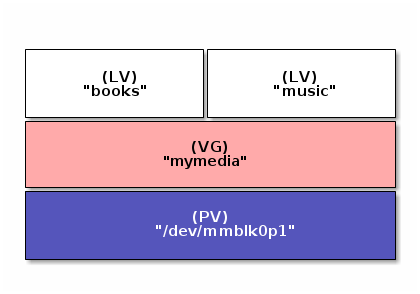
LVM has a lot of features, but for now, I’ll be learning the basics of
LVM: creating logical volumes. At the end of this entry I’ll have
created two logical volumes: books and videos. In order to to that
I have to follow these steps:
-
Create a
partitionin the physical drive -
Create a
physical volume(PV) -
Create a
volume group(VG) -
Create a
logical volume(LV)
| Because I don’t want to lose any important data from my hard drive, I will be using an empty SD card while learning about LVM. USBs or SD cards are great when learning about file systems, you always have one at hand, and if you do something wrong, you won’t be ending installing your OS again :P |
Create a partition
I’ve a new SD card. Let’s see where it’s located within the system:
user@computer> sudo fdisk -l
...
Disk /dev/mmcblk0: 28.8 GiB, 30908350464 bytes, 60367872 sectors
Units: sectors of 1 * 512 = 512 bytes
Sector size (logical/physical): 512 bytes / 512 bytes
I/O size (minimum/optimal): 512 bytes / 512 bytes
Disklabel type: dos
Disk identifier: 0x00000000
...
So it is located at /dev/mmcblk0, perfect. Now I would like to
create a primary partition taking the entire space. I’m sticking to
fdisk on this:
user@computer> sudo fdisk /dev/mmcblk0

Welcome to fdisk (util-linux 2.28.2).
Changes will remain in memory only, until you decide to write them.
Be careful before using the write command.


Command (m for help): n
Partition type
   p   primary (0 primary, 0 extended, 4 free)
   e   extended (container for logical partitions)
Select (default p):

Using default response p.
Partition number (1-4, default 1):
First sector (2048-60367871, default 2048):
Last sector, +sectors or +size{K,M,G,T,P} (2048-60367871, default 60367871):

Created a new partition 1 of type 'Linux' and of size 28.8 GiB.

Command (m for help): w
The partition table has been altered.
Calling ioctl() to re-read partition table.
Syncing disks.
Now if I run sudo fdisk -l again I should see the partition I’ve
just created:
user@computer> sudo fdisk -l
...
Disk /dev/mmcblk0: 28.8 GiB, 30908350464 bytes, 60367872 sectors
Units: sectors of 1 * 512 = 512 bytes
Sector size (logical/physical): 512 bytes / 512 bytes
I/O size (minimum/optimal): 512 bytes / 512 bytes
Disklabel type: dos
Disk identifier: 0x00000000

Device         Boot Start      End  Sectors  Size Id Type
/dev/mmcblk0p1       2048 60367871 60365824 28.8G 83 Linux
...
Ok at this point we’ve got our pillars, so to speak. Now we can start building our LVM structure.
Initialize a physical volume
In order to use a given partition as a physical volume you have to
initialize it first.
user@computer> sudo pvcreate /dev/mmcblk0p1
 Physical volume "/dev/mmcblk0p1" successfully created.
This will create a volume group descriptor at the start of the
/dev/mmcblk0p1. You can check your new volume executing pvdisplay.
user@computer> sudo pvdisplay
...
  "/dev/mmcblk0p1" is a new physical volume of "28.78 GiB"
  --- NEW Physical volume ---
  PV Name               /dev/mmcblk0p1
  VG Name
  PV Size               28.78 GiB
  Allocatable           NO
  PE Size               0
  Total PE              0
  Free PE               0
  Allocated PE          0
  PV UUID               NgHQAR-U92l-9GXv-cXcV-oCHL-pp0Y-MDA4b1
Create a volume group
Several physical volumes can be grouped into one single volume group. In this example I’m only doing a 1-1 relationship between a physical volume and a volume group.
user@computer> sudo vgcreate mymedia /dev/mmcblk0p1
 Volume group "mymedia" successfully created
To make sure your new group has been created, let’s list your system’s
volume groups.
user@computer> sudo vgs
 VG        #PV #LV #SN Attr   VSize   VFree
  MainVG      1   3   0 wz--n- 238.22g     0
  mymedia     1   0   0 wz--n-  28.78g 28.78g
Create logical volumes
We can now create two logical volumes: books and music. I’ll
give half of the space each. First books:
user@computer> sudo lvcreate -l 50%VG -n books mymedia
WARNING: dos signature detected on /dev/mymedia/books at offset 510. Wipe it? [y/n]: y
  Wiping dos signature on /dev/mymedia/books.
  Logical volume "books" created.
Then music will take the rest available space for mymedia:
user@computer> sudo lvcreate -l 100%FREE -n music mymedia
 Logical volume "music" created.
As usual I’m checking that both logical volumes have been created by
listing available logical volumes.
user@computer> sudo lvs
  LV          VG        Attr       LSize   Pool Origin Data%  Meta%  Move Log Cpy%Sync Convert
  books       mymedia   -wi-a-----  14.39g
  music       mymedia   -wi-a-----  14.39g
Nice! Both have exactly the same size.
Here I’ve been playing with percentages, but the lvcreate
command allows you, for example, to specify MB, GB. You can find some
examples
here
|
Use logical volumes
Once we’ve created a logical volume, the only thing remaining is to
format our logical volumes as ext4 filesystems and use them.
Why ext4 ? Well because once I wanted to see how shrink/extend
works right after this entry. And the easiest way to do it is by
formatting your logical volume as ext4. Other filesystems may
require extra manual steps. But of course, if you’re sure about the
type of filesystem you want, go ahead!
|
user@computer> sudo mkfs.ext4 /dev/mymedia/books

mke2fs 1.43.3 (04-Sep-2016)
Creating filesystem with 3772416 4k blocks and 944704 inodes
Filesystem UUID: a6ae793c-a735-4bae-8941-ddab3c680398
Superblock backups stored on blocks:
	32768, 98304, 163840, 229376, 294912, 819200, 884736, 1605632, 2654208

Allocating group tables: done
Writing inode tables: done
Creating journal (16384 blocks): done
Writing superblocks and filesystem accounting information:
done
user@computer> sudo mkfs.ext4 /dev/mymedia/music
mke2fs 1.43.3 (04-Sep-2016)
....Now you should be able to mount them and start using them.